Showing posts with label adsense friendly domains. Show all posts

Tuesday, 2 July 2019

0 What Is Search Engine Optimization (SEO)?

What Is Search Engine Optimization (SEO)?


What Is Search Engine Optimization (SEO)?

Search Engine Optimization (SEO)
Search Engine Optimization (SEO) is a series of web page formatting techniques and link building efforts that, when implemented properly, can help a web page rank higher in search engine results and drive traffic to a web page. Search Engine Optimization can is divided into two categories:
  1. On Page Optimization - Formatting a website or webpage to optimize its ranking in search engines.
  2. Off Page Optimization - Taking actions on the Internet to optimize a website's or webpage's ranking in search engines.
Implementing SEO is not nearly as complicated as many people believe. Writing an article that includes these formatting techniques makes an article easier to find by Internet users that use major search engines, such as Google, Yahoo, and Bing, which can drive traffic to an article. Proper implementation also includes additional on-page and off-page tasks, such as setting a web page's META tags (informational tags) correctly and building links from other sites back to a web page, which have the cumulative effect of increasing a web page's ranking in search engines.
SEO is the use of creative writing techniques to include a key word or key phrase in certain parts of an article, so search engines understand what the article is about, which is needed by search engines to properly categorize an article regarding relevancy of the article to the search term that is searched. The key word or key phrase must be repeated a number of times in specific locations within an article, so search engines associate the article with the key word or key phrase. It also includes additional easy to implement actions that can increase the ranking and visibility of an article in major search engines.
Once a page or website has been optimized using on page formatting techniques, off page strategies must also be implemented to make a page or website fully Search Engine Optimized.

What Is SEO? SEO is Search Engine Optimization.

Source

The First Step – Identify Key Word or Phrase

The first step in implementing SEO takes place before a writer even begins writing an article. It is very important that a writer identify the key word or key phrase that they intend to focus on to implement optimization techniques in their article. For example, it should be obvious by now that the key phrase in this article is what this article is about.
To find a suitable key word or phrase, consider searching major search engines for key words or phrases that you are considering using to see how other articles used them in the top search engine search results. Also use online tools such as Google Adwords or similar key word or key phrase analytical tools to determine which words or phrases are used most often in search engine searches.
It is also very important to come up with a title for the article that uses the key word or key phrase and is likely to be searched by search engine users. Always keep the searcher in mind when deciding on a title for an article. What word or key phrase would you use, if you were searching for information that is within your article?

The Second Step – Strategically Place a Key Word or Phrase

The second step involves strategically placing the key word or phrase in the article in areas of an article in which search engine spiders and bots are known to look for key words and phrases. This is the essence of On Page Search Engine Optimization, so take note of these instructions.
Please Note that as of 2013, Google has become more sophisticated in how it ranks articles, and overuse of a key word or phrase may cause a penalty. It is best to now use a key word or phrase sparingly and try to keep the concentration of them to 1% to 2% of the total words within an article. Use synonyms associated with a key word or phrase in their place, as Google now is capable of recognizing synonyms when ranking an article.
The key word or phrase should be placed in the following parts of an article to help search engines identify and properly index the article:
  • In the Title of the article
  • In the First Sentence or Paragraph of the article, highlighted in bold
  • In at least one H2 Heading in the article, and if possible, in other H2 or H3 Headings
  • Elsewhere within the Body of the article, but try to use variations and synonyms
  • In the Name of Photos included in the article and in the ALT Text for photos
That is it. Making a page optimized is not so difficult after all It can be difficult to find ways to work a key word or phrase into an article in the locations necessary for optimization without writing in awkward manner; however, a little awkwardness may be worth earning higher search engine ranking.

The Third Step – Create Good Backlinks

Off page Search Engine Optimization is just as important as on page efforts, and should not be ignored. Off page optimization essentially involves creating high quality backlinks (links from other webpages) to your article to drive traffic to your article and to increase your article's ranking in search engines. Search engines, such as Google, use the number and quality of backlinks to articles in their assessment of how important an article is and how highly it is displayed. The more backlinks from highly ranked webpages (look into a webpage's Google Page Rank), the more likely an article will be ranked highly in their search results.

The Final Step – Things to Keep in Mind When Writing, Uploading, and Maintaining Articles

In addition to carefully following the instructions in the second step above, the following should be kept in mind when trying to achieve SEO for an article.
  • The title should not only include the key word or phrase, but it should also be a title that is likely to be searched for. For example, someone looking to learn about the best time to fertilize grass is likely to search for something along the lines of “what is the best time to fertilize grass”.
  • An article should be at least 400 characters in length, and preferably at least 700 characters in length, as longer articles are given higher rankings by search engines.
  • Consider where you are uploading an article. Search engines rank websites regarding the relevancy of their content, when deciding how high to rank page links in the search results. An article that has included all of the elements of SEO will rank higher in search engines if it is published on a well regarded website versus an unknown blog.
  • If possible, include the key word or phrase in any Meta Tags or Summary Sections that are available when uploading the article to a website. This will help some search engines identify and index your article. Not all search engines read Meta Tags or Summary Sections, but including the key word or phrase in these areas is worthwhile.
  • Create a RSS feed (RSS = Really Simple Syndication) at the bottom of your article to feature updates from your blog. Creating a RSS feed is a good way of not only promoting your other articles, it also helps with achieving optimization, since search engines rank webpages that update their information regularly more highly than static webpages.
  • Periodically visit your article to see if you can make any improvements regarding optimization and content. Check to see that all links and images are working and the grammar and spelling are correct.
Keep in mind that search engines typically need a few weeks to months to find and index articles published on the Internet, so be patient when searching for your article via search engines to see if your optimization efforts undertaken when writing and publishing an article are effective.

Published By:
Technical Help Center
on July 02, 2019

Saturday, 29 June 2019

0 Free Tools That Will Drive Traffic to Your Blog

Free Tools That Will Drive Traffic to Your Blog


These 5 free tools can help you dramatically increase organic traffic to your website and they don't require you to have a massive social media following!
Whether you’re a blogger or content writer, getting the snowball of organic traffic rolling can seem like an impossible task, especially if you don’t already have a massive following on social media. If you’re like me, you love writing but aren’t so great at search engine optimization. You need easy-to-use tools you can incorporate into your writing system that are effective and won’t suck up all of your valuable content creation time. If that's you, you've come to the right place. These tools will help you increase your organic traffic without draining all your time and energy.
Before we get started, here are some key definitions so you can get the most out of this article:

Key Definitions:

Word/Phrase
Definition
"Search Engine Optimization"
Or “SEO” is the process by which you increase your website’s ranking from search engines. It refers specifically to unpaid views.
"Backlinks"
Links from other websites or social media sites that lead back to your web pages.
"Keywords"
Words or phrases that people type into search engines.
"Referral Traffic"
Traffic to your web pages from sites like Facebook, Pinterest, Reddit etc.

How Important is Organic Traffic Anyway?

Organic traffic is the most effective long-term strategy for getting your website noticed and the best part is that it doesn’t cost a thing!
Check out these statistics from SEO Tribunal:
  • Nearly 80% of users ignore paid ads in search results.
  • Organic SEO is about 5.66 times better than paid search ads.
  • Of the links clicked on after a search is made, 70% are actually organic.
As you can see, organic traffic is a powerful force in getting your content in front of viewers! The tools in this article will help you generate more organic traffic to your articles and improve your rank on Google.
But first, having an effective system for when you sit down to write will waste less of your time, and help you incorporate these tools effectively. If you don't already have a writing system, you can use mine as an example:

My Writing System:

1. I Create a List of Topics That I Want to Write About

This is an important step because sitting down at the computer without a clear idea of what you want to accomplish takes all the fun out of writing. I keep a running note on my phone and add ideas as they come to me. (Usually at 2 AM.)

2. I Choose a Topic From This List

This list may include things that I've googled without finding a satisfactory answer to, or whatever I'm interested in at the time. It also includes ideas based on my specific areas of expertise. I believe it's important to pick something you're currently passionate about so you are motivated to complete your article or blog post.

3. I Do Some Keyword Research

I make sure that my title and keywords are things people are actually searching for. I also make sure that my topic is not something so niche that I'm the only person who's curious about it. (One of the tools that you will read about below will help you do this quickly and effectively!)

4. I Do a Lot of Content Research

I believe that it's very important to do thorough research before attempting to write. Doing beforehand makes it much easier for me to write my piece, and I find it takes a lot less time.

5. I Write My Article

I look at the top two or three hits on Google and see what they have to offer. Whatever I write must be of a higher quality than their article or offer something that their article doesn't. I try to write between 800-1200 words per article. If what I write doesn't have enough substance to it, I might even combine two of my best ideas into one article.

6. I Start Getting My Article Some Traffic

Once I've published my article, it's time to start getting traffic to it. Once a week (usually Friday afternoons since this is a high traffic time) I post one of my favorite articles to Facebook. I also share my articles on Pinterest. (One of the tools that you'll find below will help you generate a significant amount of Pinterest traffic quickly and easily.)

Now that we've got some foundational knowledge of important SEO terms and established how you can have an effective writing system, here are my favorite free tools for driving traffic to my articles:

1. Uber Suggest

Uber Suggest is my favorite tool for keyword research because it is so easy to use and it helps me select topics and keywords that will get me organic traffic. When I first started writing regularly, I attempted to use Google Adsense but couldn't seem to get the hang of it and found that I was wasting a lot of time trying. Fortunately, Neil Patel's Uber Suggest is much simpler, though it still offers a wealth of information.

How It Works:

Let's say you want to write an article about latte art. Simply type your prospective keywords into the search bar. You'll see results like this come up:

On the left side of the screen, you'll see that 290 related keywords have come up. Above those keywords, you'll see the following data:
  • Volume: The number of people searching for this keyword each month.
  • Cost Per Click: The value of this keyword if you wanted to pay Google to show your work as an ad.
  • Paid Difficulty: The estimated number of people paying for their articles to come up in search results. Higher numbers mean this keyword is more competitive.
  • SEO Difficulty: How competitive this keyword is in organic searches.
The two pieces of data that I pay the most attention to on this side of the screen are Volume and SEO Difficulty. Volume gives you an idea of how much traffic you could potentially get from these keywords and SEO Difficulty shows you how much competition you'll have in fighting for those views. Ideally, you want to select keywords that have high search volume and lower rates of competition.
On the right side of your screen, you'll see five more pieces of data that will show you who the big fish are in this particular pond of subject matter:
  • Google SERP: The top 100 webpages that show up when you search this keyword in Google in order.
  • Estimated Monthly Visits: The number of views that web page gets per month.
  • Links: The number of backlinks that web page has coming in from other webpages.
  • Domain Score: The score given by Google based on how trustworthy and useful this site is.
  • Social Share: The number of times this web page has been shared on sites like Facebook and Pinterest.
While again, that is a lot of information, the two things I focus on are Google SERP and Estimated Monthly Visits. Google SERP tells me who exactly I'm competing with so I can scope out their web pages, and the number of estimated monthly visits gives me an even clearer picture of exactly how much potential traffic I can get from this keyword.

How To Get the Most Out of Uber Suggest:

Before you begin writing your article or blog post, do some research on this site to ensure that you're spending your valuable time where it will be most effective. Play around with a few different keyword ideas to see which one will get you the most traffic. Uber Suggest also offers more tools besides just the keyword tool, so spend some time checking those out too.

2. Grammarly

When you're ready to begin writing your article or blog post, I suggest using Grammarly to check your spelling and grammar. Google (and most importantly, people) look for correct grammar and spelling when deciding who to give their time to. Poor grammar and spelling will drive away traffic and hurt your rank within Google.
This is where Grammarly can help you! I don't know about you, but when I start reading an article or blog post, and I immediately stumble upon spelling or grammar errors, I quickly click out of that article and move on to the next. Subconsciously I assume that if someone doesn't know the difference between "their," "there" and "they're" they probably aren't the authority I will trust on whatever I'm topic searching for.

While Microsoft Word, Google Docs and all the other big word processors do this, Grammarly does it better. If you download the application so Grammarly can also check your work on whatever platform you are using. The accuracy and versatility of Grammarly make it an excellent tool for those writing on platforms like WordPress, Wix, Text Broker or Hubpages.
For example:

If I click that green button on the bottom right corner, I'll immediately be taken to this page:

Here, I can quickly and easily identify any errors or misspellings that my word processor may have missed!

How To Get the Most Out of Grammarly:

Download the Grammarly app so you can double check your work on a variety of platforms (including emails!) and avoid publishing your work with easy-to-fix errors! Even the free version of Grammarly can help you become a better writer and be certain of your accuracy every time you go to use a hyphen or semicolon. Copy and paste all of your work from the word document directly to the Grammarly app so you can correct any errors you may have missed.

3. Pixabay

If you don't have time, equipment or inclination to take your own, Pixabay has over a million royalty-free photographs that you can use! Professional looking photos also help you market your article or blog post on social media sites. The same way you pick up or touch items in a store that are beautiful, or have an interesting looking texture, colorful, related images encourage people to click on your work instead of someone else's. Part of what makes an article or blog post fun to read (besides relevant and engaging content, of course!) is beautiful photographs.
Let's say, for example, you are writing about latte art. Type that into Pixabay's search bar and you'll immediately find hundreds of gorgeous, professional looking photos related to your topic:

When you're ready to start sharing your article on social media sites like Facebook, Twitter, Pinterest, Instagram, etc., it's important to have a graphic with a title that will encourage people to click on your article. Canva can help you create a beautiful, social media friendly image that will encourage referral traffic! I like to create a pinnable image for the bottom of my post and a square image for the top with words across the center so it can be shared on Facebook or Twitter and doesn't show up with half my title missing. Having high-quality backlinks to your article on a variety of sites will help you get that snowball of traffic rolling.
Canva offers a wide variety of templates in the precise dimensions required for sites like Instagram and Pinterest that only require you to insert your own photo and text. This makes Canva an incredibly convenient tool for those who are not particularly graphic design savvy.

If you're more confident in your graphic design skills, you can even create your own designs from scratch:

How To Get the Most Out of Canva:

  1. Experiment with a few designs to see what you like. Sometimes my fourth or fifth design is the one I end up loving. I save all my previous designs and if I feel something I've written hasn't gotten very much traffic, I switch the images in my post and often find my traffic going up again.
  2. See what the major players are doing and learn from them. Look at social media images for topics similar to yours that are getting lots of traffic. Don't try and copy exactly what sites like Buzzfeed and Bustle are doing, but look at the colors they choose and what type of layouts get a lot of attention and then play with those variables.

5. Pin Groupie

Did you know Pinterest is one of the best sites for getting traffic to your articles?
Check out these statistics from Blue Corona:
  • Millennial use of Pinterest has increased more than any other social network—even Snapchat.
  • 87% of Pinners have purchased a product because of Pinterest, and 93% of Pinners have used it to plan a future purchase.
  • 5% of all referral traffic to websites comes from Pinterest.
  • Every day, nearly 2 million people save product-rich Pins.
If you sell a product or get paid by people viewing your articles or blog posts, Pinterest is clearly the place to share your work! But what if you don't have a huge following on Pinterest that will see your pin? This is where Pin Groupie comes in. If you've written a stellar article and created a gorgeous, social media friendly set of images to go with it, the next step is finding relevant boards to share your pinnable images on.
Again, let's say your topic is latte art. Simply go to Pin Groupie's website and type that in:

You'll be directed to a list of group Pinterest boards that are accepting new pinners. Simply follow the instructions in the "How To Join" section and apply to be added as a pinner. Once you are added, you can start pinning your article and have instant access to all the traffic that Pinterest board already has. Sometimes a Pinterest board's subscriber's can be in the thousands! It doesn't get easier than that when it comes to getting your article or blog post in front of literally thousands of eyes!

How To Get the Most Out of Pin Groupie:

  • Read the description. Then read it again! The last thing you want to do is start pinning your articles to unrelated Pinterest Boards. This will get you blocked very quickly because it looks spammy. Also, follow the instructions and only pin as often as they allow. Some group boards may even require you to pin one image from the group board to one of your Pinterest boards for every pin you upload. Whatever the instructions are, be sure to be respectful.
  • Request to be added to a variety of group boards. You will find some group boards with thousands of subscribers and hundreds of pinners and some with hundreds of subscribers and just a few pinners. Both have their advantages and disadvantages. The former will get your pin buried faster and deeper into the group board, even though it exposes your pin to thousands of viewers. The latter will keep your work closer to the top of the board for a longer period of time but also has fewer viewers. Play around and see what works for you.

©2019 Technical help centre

Published By:
Technical Help Center
on June 29, 2019

Thursday, 21 March 2019

0 How to Migrate a WordPress Site to a New Domain and Hosting [एक नए डोमेन और होस्टिंग में वर्डप्रेस साइट कैसे जोड़ें]


Moving your WordPress site to a new host can be a bit stressful. If it’s not done properly, it can result in some annoying and unexpected errors. However, if it’s handled correctly, it should be a stress free experience.
In this tutorial, I’ll demonstrate how to migrate a WordPress site to a new host and domain name, avoiding many of the common problems experienced with migrations.
Note: There are many ways to approach a migration, in this tutorial I’ll be introducing you to a manual approach. It’s not always the easiest option, but once you understand how it works, you’ll be better equipped to tackle any problems you come across when moving sites. If you’re looking for a plugin to use to migrate, try this article that runs through five useful plugins for WordPress backup and migration, but keep in mind that understanding the manual approach presented here will help you considerably when using those.

Deactivate All Plugins


Before you begin, I’d recommend that you deactivate all plugins because, when moving a WordPress site to a new host, the things that are likely to fail are your WordPress plugins. WordPress itself is well designed to adapt to new changes, but the plugins might not be.
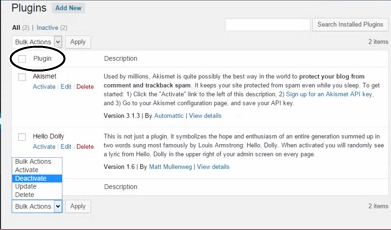
Therefore, to deactivate all activated plugins, go to the admin page -> Plugins -> Installed Plugins -> Mark all -> Bulk action -> Deactivate -> Apply
Deactivating Plugins
Backing up WordPress Database and Files
It’s best practice to always backup your website before making any changes, and a WordPress migration is no exception. There are a couple of WordPress plugins for doing this, but a manual approach is best if you want to be in complete control of the process.
Now, I’ll show you how to backup your WordPress files and database with a manual approach, and also via a plugin.

Backing up Manually


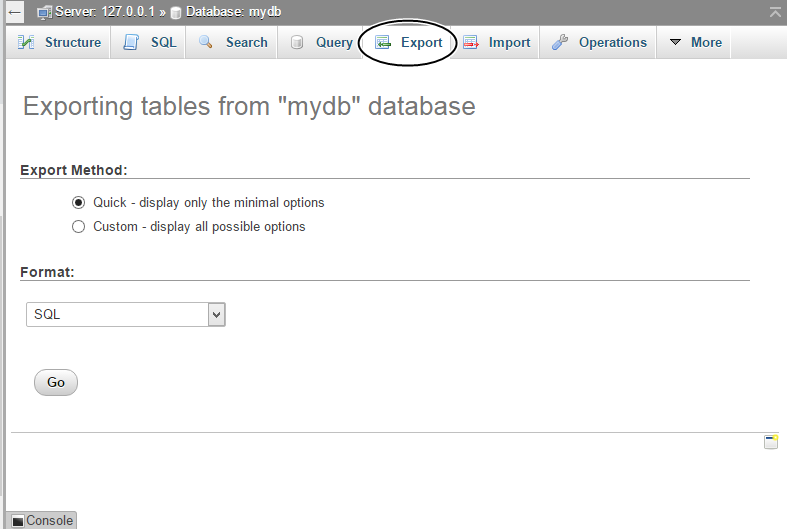
To back up your WordPress database manually: Log in to your phpMyAdmin, click on your WordPress database and select Export as shown in the image below.
Export Database
Ensure that you’re exporting in SQL Format and click Go. Your WordPress database will then be downloaded as a .sql file. I recommend that you save the downloaded SQL file to a special folder on your computer so that you can easily locate it later. You can also use the command line to export a copy of your database, you can find more information on that here.

To backup your files manually: I would recommend that you download your complete WordPress installation folder so that you won’t lose anything.

Using any FTP/SFTP client like FileZilla, log in to your host by FTP/SFTP and download your htdocs or public_html folder (or anywhere your WordPress installation resides).
Backing up with a Plugin
Download and install the UpdraftsPlus Backup and Restoration plugin. At the Installed Plugins page, locate the UpdraftsPlus plugin and activate it.
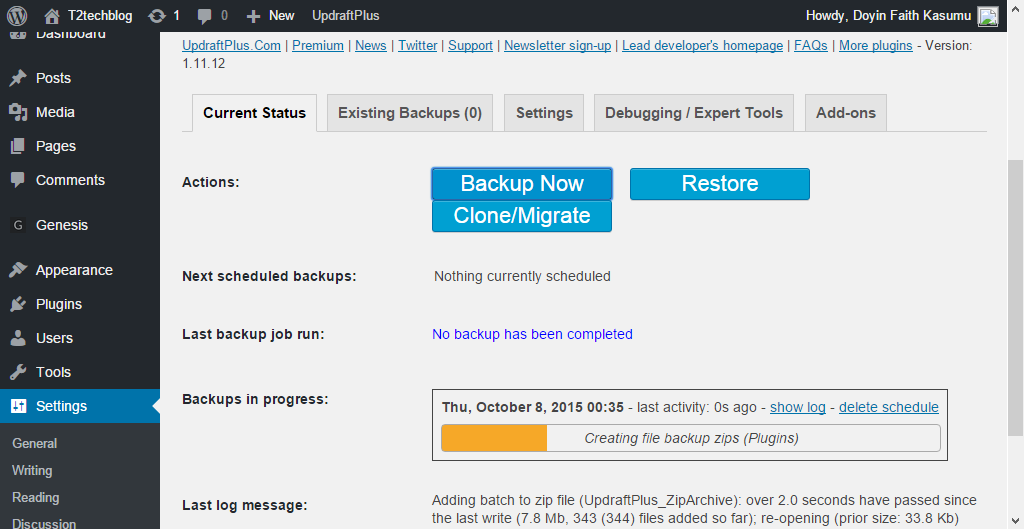
Once you have the plugin installed, at the admin page, go to Settings -> UpdraftsPlus Backups, and then click the Backup.
Updraft Plus
This might take a while depending on the size of your WordPress site, but once the process has been completed, click on the Exisiting Backups tab to download the backup to your computer and then you can move it to a special folder too.

Preparing Your Backup for Upload

Now that we have the backup, we need to modify a few things before we can move on to uploading our backup(s). Before proceeding, log in to phpMyAdmin of your new host and create a new database. Note down the name of the database, as you will be needing it later in this tutorial.

Updating the wp-config.php file

There is some information to be modified in our WordPress configuration file before moving on. Extract the ZIP archive of the WordPress installation folder you downloaded earlier, locate the wp-config.php file and open it for editing using your favorite text editor such as Notepad and Notepad++.

Edit the lines below, replace with the details of your new host and save.

define('DB_NAME', 'replace_with_database_name_you_noted_down'); /** MySQL database username */ define('DB_USER', 'replace_with_new_host_mysql_user_name'); /** MySQL database password */ define('DB_PASSWORD', 'replace_with_new_host_mysql_password'); /** MySQL hostname */ define('DB_HOST', 'replace_with_new_mysql_host'); Uploading Your Backup
We’re almost done. The next action to take is to upload your modified WordPress installation folder to the new host via FTP/SFTP.
After uploading is completed, proceed to upload your database backup.
To upload the database backup, log in to your phpMyAdmin in your new host and click the Import menu as shown below.
Import

Select the SQL database backup and upload.

Updating the WordPress Home URL and Site URL
There are several ways to set your URL for WordPress, we’ll discuss a few common methods.
If you’re moving to a new domain too, ensure you have successfully pointed your new domain to your hosting account (refer to your hosting support documentation for the exact details).

Using wp-config.php

You can set your URLs by adding the following lines to wp-config.php, this overrides and will disable these options in the WordPress dashboard.
define('WP_HOME','http://example.com'); define('WP_SITEURL','http://example.com');
The WordPress Codex has a good explanation of this.
Using a WordPress Theme functions.php File
Paste the below lines in your active theme’s functions.php file immediately after the initial line, using the editor provided by an online FTP/SFTP client, or your preferred text editor.
update_option ( 'siteurl', 'http://your_new_domain_name.com' ); update_option ( 'home', 'http://your_new_domain_name.com' );
Replace the http://your_new_domain_name.com with your new domain URL. The above code will automatically update the siteurl home option names with your new blog URL in the database. Visit your WordPress login or admin page and your site should work.
Once your site is back up, ensure that you delete the lines you added to your theme’s function.php file to prevent the updating each time your site is viewed.
Manually Updating the WordPress Home URL and Site URL
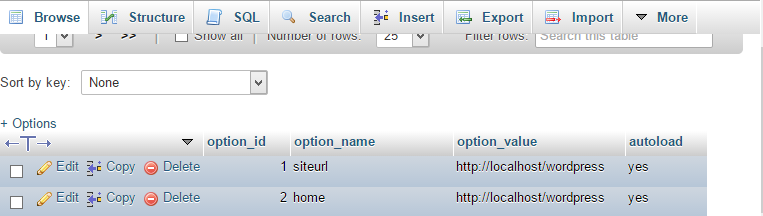
To manually update your WordPress Home URL and Site URL, login back to your phpMyAdmin, open your WordPress database, click on the wp_options table and modify the values of the site_url and home column with your new URL.
Browse
Reactivating All Plugins and Updating Permalinks
Now that everything is working fine, go ahead and activate your necessary plugins. To do that, navigate to Plugins -> installed plugins, select activate from the Bulk action drop down and hit the Apply button.
To update your permalinks, go to Settings -> Permalinks, select your desired permalinks structure and Save Changes.
301 Redirection Setup
To transfer your old domains SEO juice (or SEO value) to the new one, it’s important that you set up a 301 redirect as follows.
Open the .htaccess file in your old WordPress install folder and append the rewrite rules below so that anyone visiting your site using your old domain URL will be redirected to the new domain.
@technicalhelpcenter

Published By:
Technical Help Center
on March 21, 2019

0 How we get free domain name


The best free domains are ones with credible extensions readers or customers trust, like .com, .org, .net, and .edu. These make your readers feel more at ease by offering a professional look that puts your website in the same class as reputable organizations’ and businesses’ websites. To get a free, credible domain name, you can purchase web hosting packages with a company. Get adsense friendly domains.


Sample Way to get free domain name

  • 2. Type freenom on google search.
  • 3. Open Official Website of freenom.
  • 4. Now, Search your domain what you want.
  • 5. Check ability of your domain.
  • 6. Now book your domain and enjoy...


What Is the Difference Between a Paid & Free Website Domain?

A free website domain has either uncommon extensions like .tk (versus common extensions like .com) that don’t rank well and lack credibility or require a sign up for other paid services like web hosting services. Most small businesses can get a free domain name with a credible extension for a few dollars a month or for free by signing up for quality hosting services like Bluehost.

@technicalhelpcenter


Published By:
Technical Help Center
on March 21, 2019

Next Page Home
Top