Showing posts with label connect domain to wordpress. Show all posts

Monday, 3 June 2019

0 How to Create a free website on WordPress

How to Create a free website on WordPress:


First check out my WordPress website- cricketguru.xyz


Before You Start, Read This:

There are hundreds of different website building platforms and website builders around the market.
WordPress, Wix, Joomla, Drupal… Just to name a few.
You can also code your website from scratch, but I wouldn’t recommend it on mainly two reasons:
  • It just takes too much time (seriously)
  • Your end result will be mediocre at its best…
But which one should you choose?
Let’s take a look at these recent statistics made by BuiltWith.

How People Build Websites in 2019


CMS Comparison 2019


As you can see from the graph above, in 2019, the most popular website builders (or content management systems) are:
  • WordPress (free) 52%
  • Wix (paid) 7%
  • Joomla (free) 4%
  • Progress Sitefinity (free) 4%
  • SquareSpace (paid) 4%
  • Weebly (paid) 2%


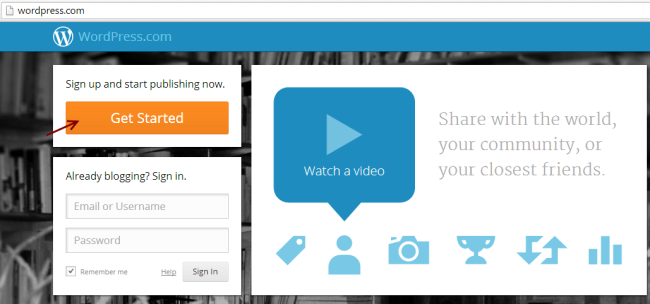
Step 1: Signup to WordPress.com

First you need to signup at WordPress.com so go to http://wordpress.com/ you would find a screen like the below one. Click onGet Started. You would be redirected to a signup page.
domain-hosting-free
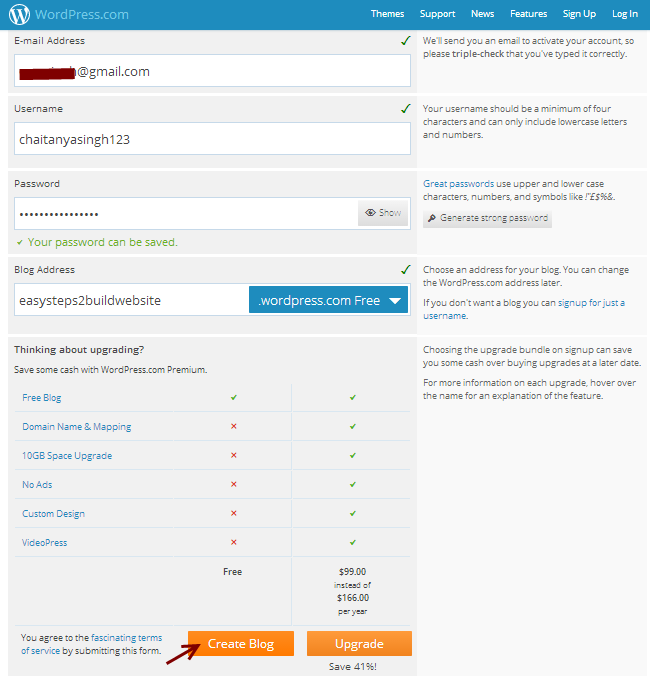
Fill out the signup form. The fields you must need to provide are E-mail Address, Username, Password and Blog Address (Domain name). Click on Create Blog! 
There are few things which you must know – The domain name you choose would be suffixed with WordPress.com (since you are using WordPress platform for creating free website), for example I choose a blog name as easysteps2buildwebsite and it has automatically been suffixed with wordpress.com so my complete domain name (Website’s address) is easysteps2buildwebsite.wordpress.com.
signup-wordpress

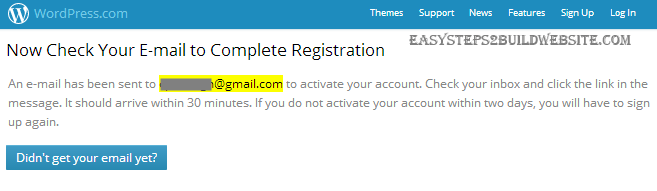
Step 2: Confirm email and Activate Blog

Once you are done with step 1, you would be able to see a screen like the below one, which will ask you to confirm your E-mail Address.
confirm email
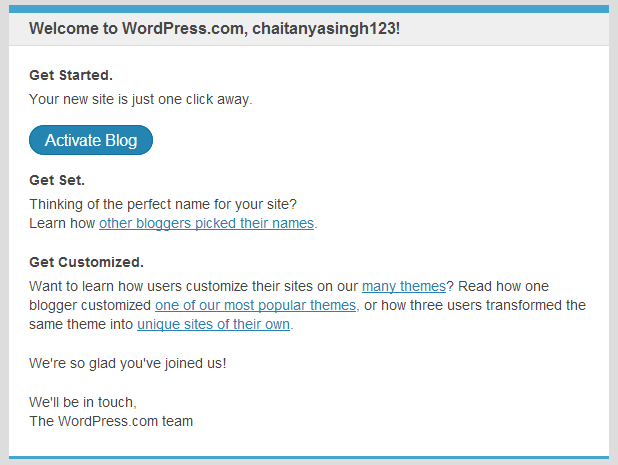
Head over to your email and Click on Activate Blog! in order to confirm the Address. The email you get would look like the one shown below.
activate-blog

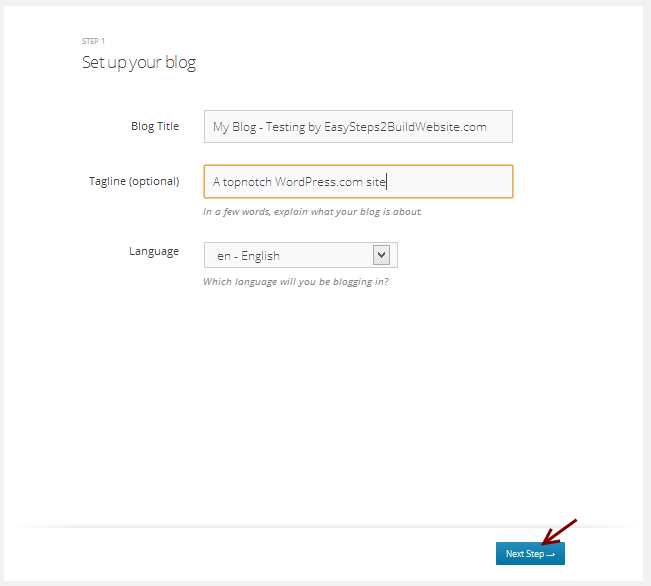
Step 3: Setup your blog

Once you are done with step 2, you would be asked for the few details about your new website such as blog Title, tagline and Language. Click on Next Step after filling up all these details.
setup-your-blog

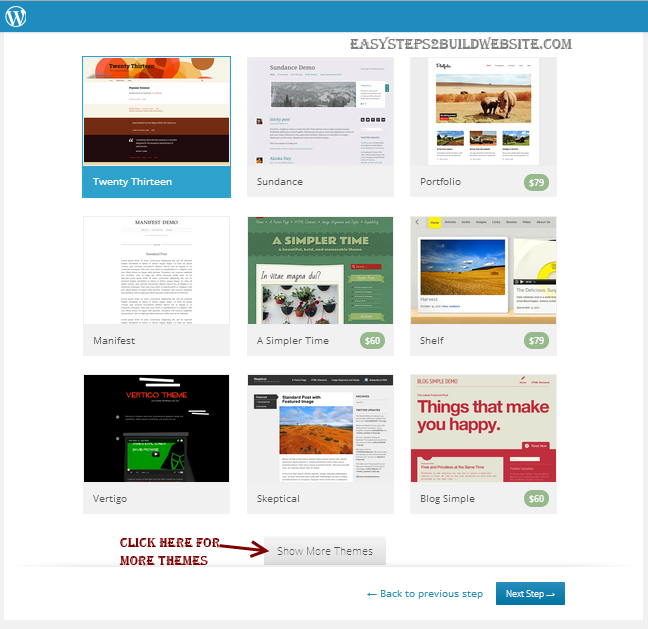
Step 4: Choose and Customize WordPress theme

In this step you must need to choose a theme for your website. There you would find free and premium themes both. Choose any of the free theme, select it and head over to the next step.You can also browse more free themes at http://theme.wordpress.com/themes/sort/free/.
choose-theme
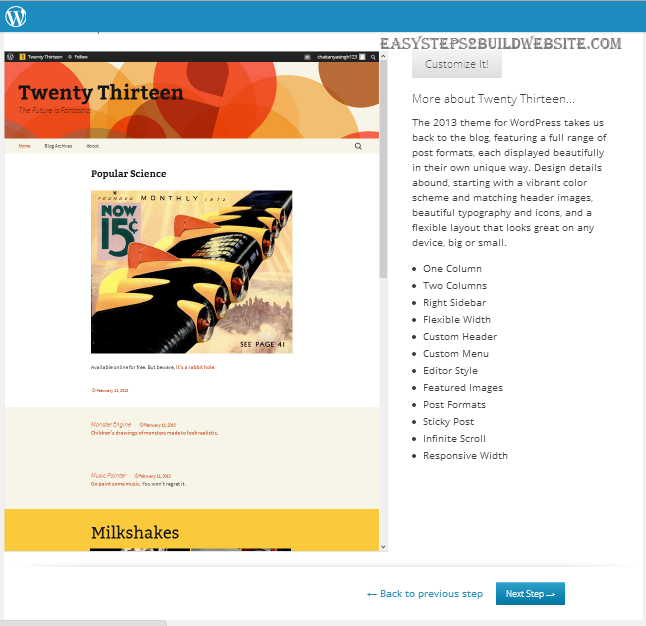
Customize the theme if you want otherwise click Next Step
customize-theme


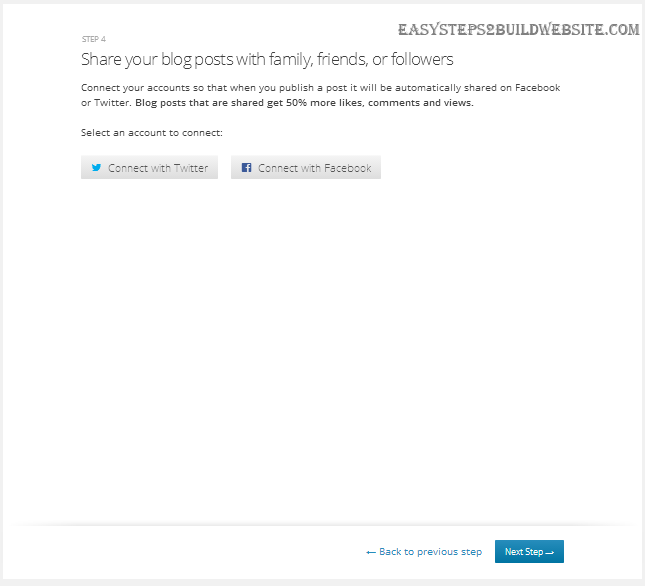
Step 5: Connect with Facebook or Twitter

You may choose to configure your twitter and Facebook accounts here. You can also skip this step and go to next step. You would be able to configure these items later.
connect


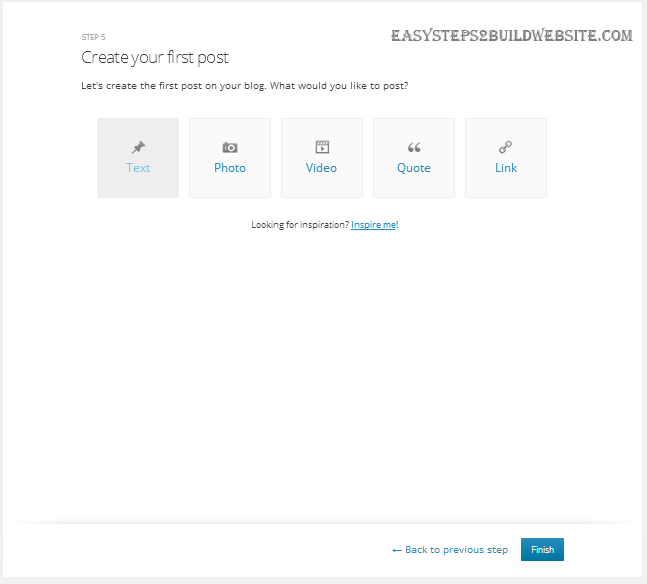
Step 6: Finish the Process

Click Finish! You have successfully created a free website on WordPress. It’s time to check how the website looks.
finish-installation

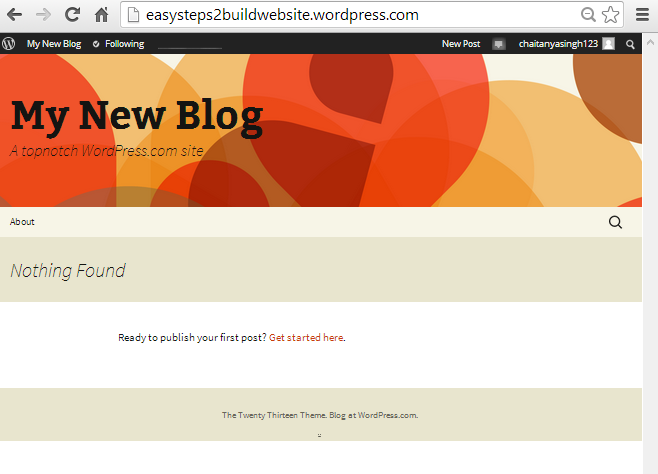
Step 7: Visit your newly created Website

Go to the browser and give your complete domain name (Website’s URL). You would be able to view your website. Cool huh! The whole process took just couple of minutes to setup everything. Wait!! We are not yet finished, it’s just the beginning, you would need to change the look and appearance of your website to make it look attractive. You can do so by referring the next section.
visit-wordpress-com

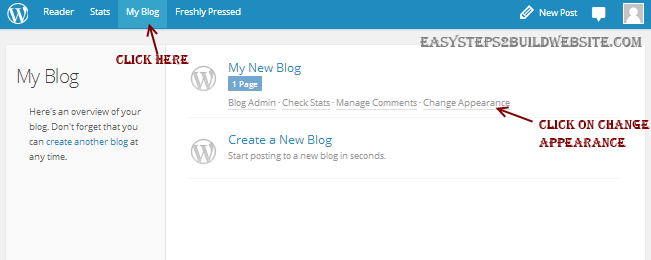
Change the Appearance

In order to change the appearance of your newly created website. Click on My Blog at the menu bar and then click on Change Appearance. Refer the below snapshot for the same.
change-appearance
You would find the below screen. This is your WordPress Dashboard, you can do lot more things using the left sidebar. We are on the Appearance tab in the left sidebar which allows you to customize existing theme and switch between new themes. Are you able to see the left black sidebar? let me cover few basic things about the sidebar before I finish this tutorial.
  • Dashboard: For WordPress, Plugins and Themes updates.
  • Posts: For editing, deleting and writing new posts.
  • Media: For managing and uploading new media files such as images and videos
  • Pages: For Managing and creating new pages on your Blog.
  • Comments: For Moderating comments – Here you can approve, delete and reply to the comments.
  • Appearance: We already covered it earlier – for trying out new themes and customization.
  • Settings: Lot more things to do. Go through the settings and configure them as per the need.

@technical help center

Published By:
Technical Help Center
on June 03, 2019

Thursday, 21 March 2019

0 How to Migrate a WordPress Site to a New Domain and Hosting [एक नए डोमेन और होस्टिंग में वर्डप्रेस साइट कैसे जोड़ें]


Moving your WordPress site to a new host can be a bit stressful. If it’s not done properly, it can result in some annoying and unexpected errors. However, if it’s handled correctly, it should be a stress free experience.
In this tutorial, I’ll demonstrate how to migrate a WordPress site to a new host and domain name, avoiding many of the common problems experienced with migrations.
Note: There are many ways to approach a migration, in this tutorial I’ll be introducing you to a manual approach. It’s not always the easiest option, but once you understand how it works, you’ll be better equipped to tackle any problems you come across when moving sites. If you’re looking for a plugin to use to migrate, try this article that runs through five useful plugins for WordPress backup and migration, but keep in mind that understanding the manual approach presented here will help you considerably when using those.

Deactivate All Plugins


Before you begin, I’d recommend that you deactivate all plugins because, when moving a WordPress site to a new host, the things that are likely to fail are your WordPress plugins. WordPress itself is well designed to adapt to new changes, but the plugins might not be.
Therefore, to deactivate all activated plugins, go to the admin page -> Plugins -> Installed Plugins -> Mark all -> Bulk action -> Deactivate -> Apply
Deactivating Plugins
Backing up WordPress Database and Files
It’s best practice to always backup your website before making any changes, and a WordPress migration is no exception. There are a couple of WordPress plugins for doing this, but a manual approach is best if you want to be in complete control of the process.
Now, I’ll show you how to backup your WordPress files and database with a manual approach, and also via a plugin.

Backing up Manually


To back up your WordPress database manually: Log in to your phpMyAdmin, click on your WordPress database and select Export as shown in the image below.
Export Database
Ensure that you’re exporting in SQL Format and click Go. Your WordPress database will then be downloaded as a .sql file. I recommend that you save the downloaded SQL file to a special folder on your computer so that you can easily locate it later. You can also use the command line to export a copy of your database, you can find more information on that here.

To backup your files manually: I would recommend that you download your complete WordPress installation folder so that you won’t lose anything.

Using any FTP/SFTP client like FileZilla, log in to your host by FTP/SFTP and download your htdocs or public_html folder (or anywhere your WordPress installation resides).
Backing up with a Plugin
Download and install the UpdraftsPlus Backup and Restoration plugin. At the Installed Plugins page, locate the UpdraftsPlus plugin and activate it.
Once you have the plugin installed, at the admin page, go to Settings -> UpdraftsPlus Backups, and then click the Backup.
Updraft Plus
This might take a while depending on the size of your WordPress site, but once the process has been completed, click on the Exisiting Backups tab to download the backup to your computer and then you can move it to a special folder too.

Preparing Your Backup for Upload

Now that we have the backup, we need to modify a few things before we can move on to uploading our backup(s). Before proceeding, log in to phpMyAdmin of your new host and create a new database. Note down the name of the database, as you will be needing it later in this tutorial.

Updating the wp-config.php file

There is some information to be modified in our WordPress configuration file before moving on. Extract the ZIP archive of the WordPress installation folder you downloaded earlier, locate the wp-config.php file and open it for editing using your favorite text editor such as Notepad and Notepad++.

Edit the lines below, replace with the details of your new host and save.

define('DB_NAME', 'replace_with_database_name_you_noted_down'); /** MySQL database username */ define('DB_USER', 'replace_with_new_host_mysql_user_name'); /** MySQL database password */ define('DB_PASSWORD', 'replace_with_new_host_mysql_password'); /** MySQL hostname */ define('DB_HOST', 'replace_with_new_mysql_host'); Uploading Your Backup
We’re almost done. The next action to take is to upload your modified WordPress installation folder to the new host via FTP/SFTP.
After uploading is completed, proceed to upload your database backup.
To upload the database backup, log in to your phpMyAdmin in your new host and click the Import menu as shown below.
Import

Select the SQL database backup and upload.

Updating the WordPress Home URL and Site URL
There are several ways to set your URL for WordPress, we’ll discuss a few common methods.
If you’re moving to a new domain too, ensure you have successfully pointed your new domain to your hosting account (refer to your hosting support documentation for the exact details).

Using wp-config.php

You can set your URLs by adding the following lines to wp-config.php, this overrides and will disable these options in the WordPress dashboard.
define('WP_HOME','http://example.com'); define('WP_SITEURL','http://example.com');
The WordPress Codex has a good explanation of this.
Using a WordPress Theme functions.php File
Paste the below lines in your active theme’s functions.php file immediately after the initial line, using the editor provided by an online FTP/SFTP client, or your preferred text editor.
update_option ( 'siteurl', 'http://your_new_domain_name.com' ); update_option ( 'home', 'http://your_new_domain_name.com' );
Replace the http://your_new_domain_name.com with your new domain URL. The above code will automatically update the siteurl home option names with your new blog URL in the database. Visit your WordPress login or admin page and your site should work.
Once your site is back up, ensure that you delete the lines you added to your theme’s function.php file to prevent the updating each time your site is viewed.
Manually Updating the WordPress Home URL and Site URL
To manually update your WordPress Home URL and Site URL, login back to your phpMyAdmin, open your WordPress database, click on the wp_options table and modify the values of the site_url and home column with your new URL.
Browse
Reactivating All Plugins and Updating Permalinks
Now that everything is working fine, go ahead and activate your necessary plugins. To do that, navigate to Plugins -> installed plugins, select activate from the Bulk action drop down and hit the Apply button.
To update your permalinks, go to Settings -> Permalinks, select your desired permalinks structure and Save Changes.
301 Redirection Setup
To transfer your old domains SEO juice (or SEO value) to the new one, it’s important that you set up a 301 redirect as follows.
Open the .htaccess file in your old WordPress install folder and append the rewrite rules below so that anyone visiting your site using your old domain URL will be redirected to the new domain.
@technicalhelpcenter

Published By:
Technical Help Center
on March 21, 2019

Next Page Home
Top